A successful database attach, a running service, and visible tables in SSMS only mean that the file structure can be read by the engine, not that the business data inside is complete. Especially after fragment extraction or a database that has been through REPAIR_ALLOW_DATA_LOSS, corrupted pages are simply dropped without any error in the interface. The lost records may only be discovered when finance fails to reconcile at month-end.
Verification must be done layer by layer, in the correct order: first secure a copy → engine-level consistency → constraints and relationships → accounts and permissions → recovery point-in-time → business and financial reconciliation → isolated environment integration testing. If one layer fails, do not move to the next; otherwise, problems found later will be misjudged.
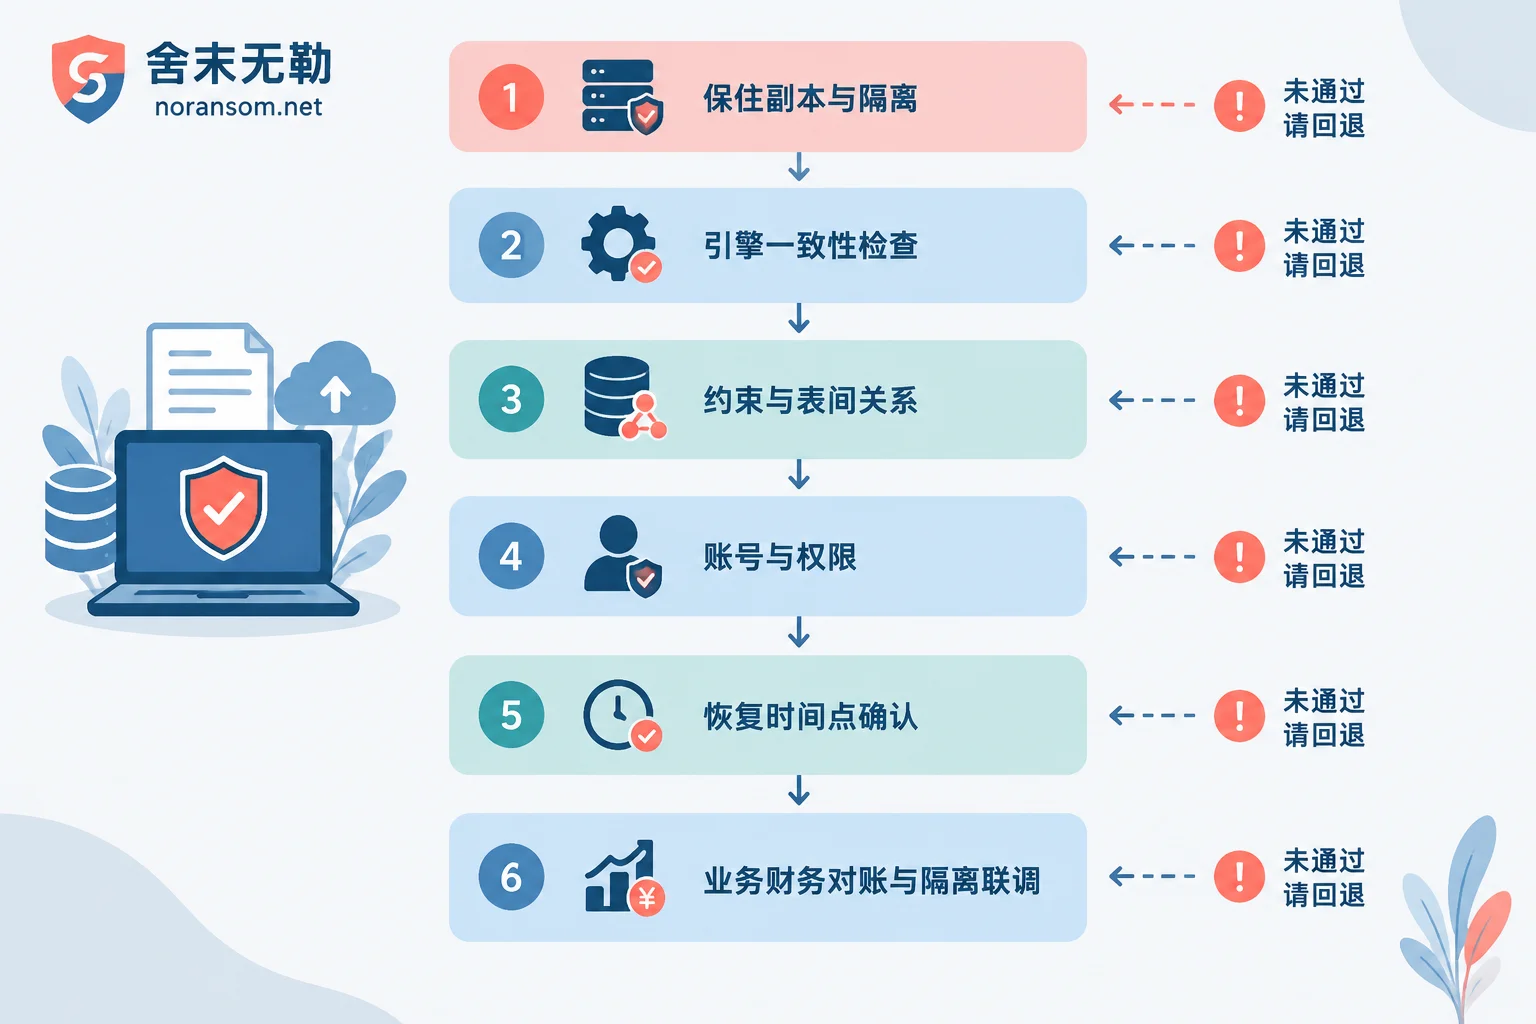
Three things to do before touching anything
1. Make a copy of the recovered database and perform all subsequent checks on that copy.
If this is the only result from fragment extraction or a specialized repair tool, it is the original. Once you run repair commands, rebuild indexes, or delete duplicate data on it, there is no second chance if something goes wrong. The correct approach is to first make a full backup of it (BACKUP DATABASE ... TO DISK), save the .bak file and the original .mdf/.ldf files to an offline disk, and then restore the copy to a new database name for validation. Do not delete the original encrypted files or server images either—if a different recovery path is needed later, you will have to go back to them.
2. Do not connect it to the production network, and do not let users start entering data.
Many organizations rush to resume operations, bringing the business online as soon as the database is restored. Then during verification they discover three days of missing data, but by then new and old data are mixed together, and re-restoring would require re-importing the new entries. Keep the environment isolated during verification to avoid using and checking simultaneously, and to prevent the recovery environment from reconnecting to a network that may still be compromised. If files continued to be encrypted after disconnection during the attack, first confirm that encryption has indeed stopped before discussing recovery validation.
3. Clearly document how this data was obtained.
Different recovery paths require completely different investigation focuses:
- Full backup + log restore to a point in time: structure is usually intact; focus on point-in-time and gap intervals;
- Only an older full backup: structure is intact; focus on how many days are missing and who will re-enter them;
- Fragment extraction/tool repair after partial encryption of database files: focus on page-level corruption and intra-table data misalignment;
DBCC CHECKDB ... REPAIR_ALLOW_DATA_LOSShas been executed: focus on which tables and records correspond to the discarded pages.
Layer 1: Engine-level consistency check
Run on the copy:
DBCC CHECKDB ('你的库名') WITH NO_INFOMSGS, ALL_ERRORMSGS;It checks allocation structures, system catalogs, indexes, and the physical and logical consistency of every table. Only if the returned result contains no error messages does this layer pass. For large databases, this command may take a long time—let it finish, do not cancel midway.
If consistency errors are reported, do not rush to run the suggested repair. Microsoft's repair recommendation is the minimum usable level; the literal meaning of REPAIR_ALLOW_DATA_LOSS is "allow data loss"—it brings the database online by discarding corrupted pages, losing entire page records. The correct order is: note the object IDs and page numbers involved in the errors, first confirm whether a cleaner backup or copy is available; only after confirming no other options and after making a full backup of the current state should repair be considered.
If a forced repair has already been run, this layer should be done in reverse: retrieve the execution output and SQL Server error logs, record the pages reported as deleted/corrected, locate the specific tables by page number (DBCC PAGE or reverse lookup by object ID), and list "these tables may have missing records" so that the business side can focus on them during reconciliation. Skip this step, and the lost data will essentially be undetectable later.
Layer 2: Constraints and inter-table relationships
Being able to read the structure does not mean the relationships are correct. Incomplete log rollbacks or misaligned fragment reassembly can leave orphan records such as "details without a master" or "outbound order without corresponding items." When the application opens such a document, it may throw errors or show zero amounts.
DBCC CHECKCONSTRAINTS WITH ALL_CONSTRAINTS;Running for the entire database is expensive; if time is tight, run it separately for core tables (DBCC CHECKCONSTRAINTS ('表名')). Every violation record listed in the returned result must be manually reviewed to determine whether it was originally allowed by the business or is a break caused by this recovery.
Two other easily overlooked things:
- Identity column seed values. Use
DBCC CHECKIDENT ('表名', NORESEED)to compare the current identity value with the maximum value in the table; inconsistency will cause primary key conflicts when inserting new documents. - Relationships not maintained by foreign keys. Many domestic business systems and legacy account sets do not have foreign keys at all; relationships are enforced by the application. In this case, CHECKCONSTRAINTS cannot find problems, and you must write SQL to manually compare master and detail tables: find document numbers in the detail table that do not exist in the master table using
LEFT JOIN.
Layer 3: Logins, database users, and permissions
After switching instances or reinstalling SQL Server, the SIDs of instance-level logins and database users may not match, creating orphaned users. Symptoms include the application being unable to connect, or connecting but encountering permission errors when executing stored procedures. Check:
SELECT dp.name, dp.type_desc, dp.sid
FROM sys.database_principals dp
LEFT JOIN sys.server_principals sp ON dp.sid = sp.sid
WHERE dp.type IN ('S','U','G') AND sp.sid IS NULL
  AND dp.name NOT IN ('guest','INFORMATION_SCHEMA','sys');
For the identified users, remap them using ALTER USER [用户名] WITH LOGIN = [登录名]. Also confirm whether SQL Server Agent jobs, maintenance plans, linked servers, and Database Mail have been restored—these are not brought over when only user databases are restored, and missing backup jobs can lead to "running naked again after recovery."
Do not reuse old passwords for reset accounts. If this is a ransomware incident, the sa and business account passwords have likely been compromised; change passwords on a confirmed clean device.
Layer 4: Determine the recovery point-in-time and the size of the gap
This layer determines the re-entry workload and must give the business a clear time boundary.
For core transaction tables such as orders, transaction logs, vouchers, inventory in/out documents, and operation logs, check the last record:
SELECT MAX(单据日期), MAX(创建时间), COUNT(*) FROM 订单表;
SELECT CAST(创建时间 AS DATE) d, COUNT(*) FROM 订单表
WHERE 创建时间 > '2024-01-01' GROUP BY CAST(创建时间 AS DATE) ORDER BY d DESC;
A daily count curve is more useful than a single MAX value: if the order volume in the last few days suddenly drops to a fraction of normal, it means not just the tail time period is missing but that the data itself has gaps, and you need to go back to Layer 1 to find the cause.
Also note three points:
- Attacks often start earlier than discovery. The attacker may have been inside for days before encryption triggered; data from that period may not be trustworthy, so extend the time window further back.
- Multiple databases may not have consistent point-in-time. If the main business database, attachment database, and intermediate database come from different backups, they will be misaligned, and cross-database documents will not match.
- Files outside the database. ERP attachments, scanned documents, image materials, and exported reports are usually stored in the file system. Restoring the database does not mean these files are not encrypted; it is common for paths to be accessible but files unopenable. They must be inventoried separately.
Layer 5: Business and finance reconcile themselves
The first four layers are IT's job; this layer must be done by the people who use the accounts—IT cannot tell whether amounts are reasonable. Key comparisons:
- Finance: whether debits and credits are balanced, whether general ledger and subsidiary ledgers match, whether opening balances agree with prior period closing figures;
- Inventory: beginning and ending quantity and amount balances, inventory ledger versus physical spot checks;
- Open documents: whether the status of documents pending review, pending shipment, or suspended settlement are abnormally stuck or rolled back;
- Key master data: counts of customers, suppliers, materials, and price lists, and their most recent modification records.
Standard account sets like Kingdee and Yonyou come with built-in account set checks, closing checks, or reconciliation tools; run them directly—they cover more than manual spot checks. Different versions vary greatly in detection items and repair capabilities; do not casually click repair on "automatically repairable" items in the detection report without first confirming backups.
Layer 6: Walk through a complete business process in an isolated environment
Attach the business system to this copy database and perform end-to-end validation in an isolated internal network: each module can log in normally, reports can be generated, historical documents can be viewed and printed, and then actually create a new document and complete the full process of review, modify, unreview, and delete. This step catches problems that read-only checks cannot find: identity column conflicts, missing triggers, stored procedures damaged by dropped pages, and query timeouts caused by index corruption. After testing, delete the test documents.
Once validation passes, immediately make a fresh full backup of this database, switch to production, and then go live in the order of "stop writes first, then import re-entered data, finally open to all users," and arrange an observation period for the business to continue discovering scattered issues during use.
If reconciliation fails, first classify the problem
- Entire time period missing: This is a backup coverage issue. Continue searching for usable copies from shadow copies, log backups, off-site synchronization, third-party backup appliances, or intermediate tables/front-end systems of the business system—recover as much as possible.
- Structural corruption, page loss: This indicates that the current recovery path has already lost data. Evaluate whether to re-extract from another set of original files instead of patching the already repaired database.
- Data misalignment, garbled text, obviously absurd amounts: Often seen in fragment extraction reassembly; redo at the original file level. Using SQL to modify data on the production database will only mask the problem.
Whether more can be recovered depends on the extent of encryption of the original files, which copies remain, and what operations have been performed. This part requires examining the actual files; it cannot be determined from symptoms alone. If you only have an encrypted .mdf left, or after forced repair you find key months of data missing, stop all writes and repairs, preserve the current state, and then perform an assessment of backup and database recovery paths; if you are unsure which type of encryption affected the current database files or whether decryption is possible, you can also first perform family identification and recoverability assessment.
A final reminder: passing verification only means the data is usable, not that the system is secure. If you go live before the intrusion path is clarified, passwords are changed, and backups are rebuilt, another incident is likely within weeks. Recovery acceptance and security hardening are two separate tasks, and both must be completed to truly wrap up.



Comments(0)